
Level 12 - Pure of Heart, Brown of Trouser
(click map above to open it in a new window)
Goals
- Pick up a cypher chip
Walkthrough
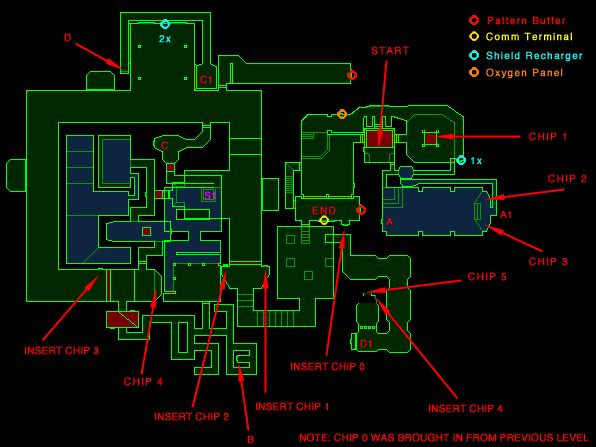
You start this level with a chip you brought with you from Magnum Farce. The room you start in has an elevator that goes to three different doors. Your first step, however, might be to collect the ammo on the ledges just behind your starting position... take the elevator up, then step across as you get to the ledges. Once this is done, you need to pick a door. The east door leads to a room that's surrounded by a ledge gotten to from the north door... so if you have a preference about firing up or down, you can pick the one that makes life easiest for you. Things that are important in this area: you need to clear a path to the recharger at the end of the ledge, and you need to make sure you're not too distracted by baddies to grab the chip under the crusher, when you have the chance. (You probably also want to clear the hunters at the west end of the ledge, so they're not bothering you when you take the west door off the elevator.)When this area is all clear, and the recharger is reachable, head west. The switch on the wall in the first room opens a stairway, which leads to the room marked END. In this room is the first chip insertion slot, a terminal, and a pattern buffer. Once you've disposed of the chip, head back and grab the one under the crusher. (You'll notice, while you're there, that the door next to the recharger is now open. You'll need this soon.)
The room directly after the terminal is full of compilers. Once they're cleared, you have a choice: you can follow the pillars around (the last will drop as you approach it) and clear out the corridor you'll need to go through to finish the level (sometimes it's nice to have your work done when you're tired), or you can head on down the stairs, following the normal path of the level. In either case, you'll have to get to the stairs at some point. Troopers galore will teleport in and try to stop you... pay them no mind. (Well, not NO mind... kill them, but don't dwell on it.) At the bottom of the stairs you'll find a chip insertion slot. Fill it with the chip you got from under the crusher. This opens a second insertion slot, on the other side.
Okay, lots of running around, but there's no remedy for it. Head back to the small opening you saw earlier, next to the recharger. It leads to an underwater grotto, full of f'lickta. If you're agile (and remember to open all the doors properly), you don't even need to kill them... hit the switch at A to open the exit, then head to the east end of the room, where there are two chips waiting. Pick one up, and head through the doorway between the chips. Follow the passage until you can climb out of the water. There's a semi-secret door in an alcove just to the left that leads to the elevator room, or you can go back the way you came and leave through the crusher room. Back again, through the area you're done with, back down to the insertion slot. Add your chip. Voila... door opens.
Advice: save yourself hassle and head back now for the other chip. Save as you pass the end room again.
This brightly lit white corridor will be the center of several battles. The first thing you come to is an alcove with a small pool in front of it. There's nothing you can do here at the moment... so move on.
The first door on your right (just after the first turn) leads to a save term. Fight your way there... it'll be nice to have later. Coming back out, you'll notice a large open area to your right... there's a 2x recharger in the wall there. Kill the hunters first, though. It's a pain to get shot while you're charging up.
Continue down the corridor, turning twice more... you'll come to a half-closed door; the chip you're carrying will open it. (Slot's to your left, if you're not paying attention.) Take the elevator down. Explore the maze, there's a bit of ammo down there, and eventually work your way to switch B. This will open the north door out of the maze. You'll find yourself in a shallow series of waterways, with compilers and troopers to worry about. When all are dead, take the elevator up, and kill the enforcer. The switch next to him (C) opens not only the door out of this area, but door C1, on the other side of the hall. It looks like an alcove only... but the windows on the other side of the room should give you the hint that there's more here than meets the eye. Walk through the north wall, and around to the far side. Grab the ammo, break the wires (D)... and go save again. (These wires open a door (D1) in the final area, giving access to the final chip insertion slot... but you need the chip for it first.)
Okay, back to the first alcove in the white corridor (back to the way in). The alcove behind the pool is now open (even if it doesn't look it)... walk through the wall and drop down. The switch in front of you is your ticket out. (Not yet.) If you go right at this point, you'll find yourself in a pool. There's nothing you HAVE to have in the pool... but there is quite a bit of ammo (and a large number of guards). Going right brings you to a small room with a platform, a switch, and a bunch of f'lickta. Kill the f'lickta, cause they're annoying. Then check out the situation. You have to use a range weapon on the switch, because it's very high... in fact, so high that you can't stand on the platform and hit it. This means you need to back up, fire a grenade at the platform, then run forward and get on it before the grenade hits... and be prepared to jump off almost before it reaches the top, because it doesn't stop at ALL, and the doorway at the top is the same height as the apex of the elevator... it's very, very easy to miss the jump.
Once you're up, head for the chip. You'll activate a couple of cyborgs when you do, but it's easier to deal with them on the other side (not through bars), so just ignore 'em. Drop back down, head back to the dropchute you came in at, and hit the switch to send you up. (It's not instant, so you have time to punch it, then back up onto the elevator, thereby saving ammo.)
At the top, you'll find yet more baddies hanging around. Do one last run down the corridor, to be sure you didn't miss any ammo caches, and to be sure you have a full 2x charge... then head back up to the top of the stairs. Follow the pillars around to the opening on the east wall, and head down that passageway. You'll see an enforcer guarding a switch (that's what those wires exposed); the switch raises the pillars blocking the final chip insertion slot. Drop in the chip you're carrying, and a door will open to allow access to the 5th and final chip on the level. Head back to the terminal in the room marked END, and off you go.
Available Weapons and Ammo
|
|
Secrets
The only secret on this level is the 3x charger at the bottom of the small pool in the first alcove of the white corridor (S1). Given that you have a 2x charger nearby, save this until you REALLY need it.