
Level 8 - Halls of the Mountain Kings
(click map above to open it in a new window)
Goals
- Reach the final poly
Walkthrough
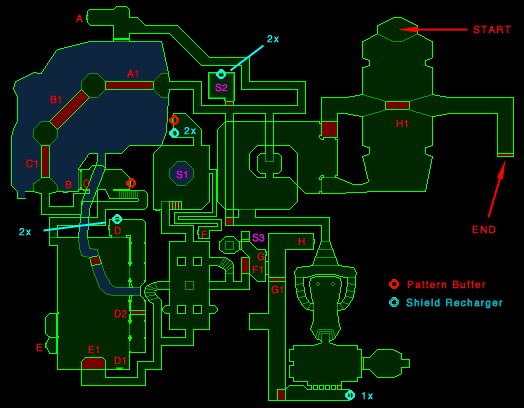
You begin this level on a pillar overlooking a dark outdoor area. Dropping off the pillar brings in a crowd of nasties... but the area's big enough that avoidance isn't too hard. Feel free to pass by the pillars they all came in on... but stay to your side of the two white pillars past that, until you've killed off the first wave. (Passing THOSE pillars triggers a second wave, which includes several cyborgs, among other things; easier to deal with these in pieces.)Once the area is peaceful again, head out through the opening at the south. Drop down to the next level and follow the path around. The first thing you'll come to is an elevator that'll take you back up to the partial bridge in the room you started in. Don't bother with this now... but you'll need it at the end of the game.
Continuing along from where the elevator started, you'll come around to a section where a pair of troopers are high above you, dropping grenades on you. The angle's pretty steep for shooting, but here's a trick: stay pretty close to the base of the wall (not right up against it, but close enough that the grenades don't come over the edge). The troopers will take themselves out. Once they're dead, collect the ammo nearby, and drop into the chute across the courtyard.
Ahead of you is a T. Going left brings you to a large open-water area with islands in it (and a lot of compilers). On the way there, you passed a corridor heading off to the left... this heads up via an elevator to the southeast corner of the map. Lots of baddies to kill, some ammo to pick up. There's another dropchute at the south end of the open room you eventuall come to... drop into it and you're in a big room with white pillars along the south edge. The leftmost white pillar lifts up, allowing you access to the area behind it... but use the pillars to help you wipe out the troopers before heading back there. (It's a tight space... they'll as often as not fire grenades into the pillars, damaging themselves, as through the gaps towards you.) In the corridor behind the pillars is a 1x recharger, and an elevator at the far end. (Watch the enforcer ambush!)You'll find a dead-end at G1 if you head up there now... but remember this area, you'll be coming back here later.
Back on the other side of the pillars, head for the door on the east wall. Kill all the nasties that come boiling out after you, and go in and snag the 3x canister on the floor. The teleporter will bring you back to the open room just above here (the one you dropped in from). Head back to the corridor system that the first dropchute put you in. (In fact, you'll pass the ledge from which the troopers wasted themselves... you can drop into the initial dropchute from there.)
Instead of heading left in the tunnels, head right. This will lead you around, eventually, to a room overlooking the watery area from the north. (Hunters galore.) At the far end of the room is a switch (A); this will raise the first section of the walkway across the water (A1) You can see it come up through the window (but make sure the green hunter is dead first, or you will be). Follow the corridor back around to the water, and out to the first island. You'll see a switch high up on the wall (B); shoot it to raise the second segment (B1). The switch (C) for the third segment (C1) is inside a window to your left - beware, stepping on the second island triggers some hunters inside the room.
The first pattern buffer is in this room, and now is a good time to use it. Once you do, head up the stairs... you're overlooking a large, open room full of compilers. (You can come into this room via an underwater passageway from the area you just left... if you do that, you'll find the shotgun in the canal more quickly.) Once the compys are gone, drop into the canal, and head under the east wall... you can climb the water column to get into the ledge area. North is a 2x recharger and a switch (D); this switch raises a second switch (D1), which in turn drops the blocking wall D2, allowing you to the southern edge of the ledge. (Because of a Marathon bug, switch D1 can only be activated by punching or by a weapon... your action key will not work.)
Once you step into the southern part of the ledge, things heat up again. Doors open on the far wall, disgorging hunters and troopers by the score. The troopers drop, and fire grenades at you from the floor... the hunters stay put and snipe at you. First order of business is to clear the hunters... because they're standing in the way of a switch you need (E). Once you can hit E, it'll raise platform E1, which takes you out of this area.
The next room is a maze of stairs, pillars, and narrow corridors... perfect for all those cyborgs you're about to meet. You can either stay in this room, using the pillars as cover from cyborg grenades, or dash out the north passageway, into another room with its own complement of nasties. (If you choose to head out first, don't lower the staircase with the switch just to the left of the room's entrance: that'll keep the cyborgs mostly out.) This next room has an alcove to the north, with a pattern buffer and a 2x recharger... but watch the pair of troopers hiding in there. Once you're confident that you can move again, you'll find a narrow passageway on the east wall of the room... this leads to a switch (F). This switch drops platform F1, opening your escape route from this area. Head back to the area with the cyborgs. (You'll need to raise the stairs now.) Take the eastern staircase, and drop into the room made available behind F1. The teleporter is open... but hit that switch on the wall (G) before you go.
The teleporter brings you back near the first dropchute. Drop in, and take your first two lefts, heading back up that narrow elevator leading to the room with the white pillars at the bottom of the map. Slip behind the pillars, and you'll find that the wall blocking your way before (G1) is gone now. (That's what switch (G) took down.) Behind it, you'll find switch H (and a trooper). This raises the bridge in the very first part of the level (H1), giving easy access to the end door. Head on back and out!
Available Weapons and Ammo
|
|
Secrets
- In the room just before the small alcove containing the pattern buffer/recharger combo, there's a pool (S1) whose level is sufficiently below the floor that jumping out unaided is impossible. There's a flamethrower and some napalm canisters at the bottom - and the flamethrower itself can give you the boost you need to exit the pool.
- Off the corridor leading to the large water-filled area is a small room (S2) with a 2x recharger and an oxygen canister. This is a pretty central location; you should find this useful.
- In a room you must drop into then teleport out of near the bottom of the map is a small alcove (S3) with some AR ammo in it.