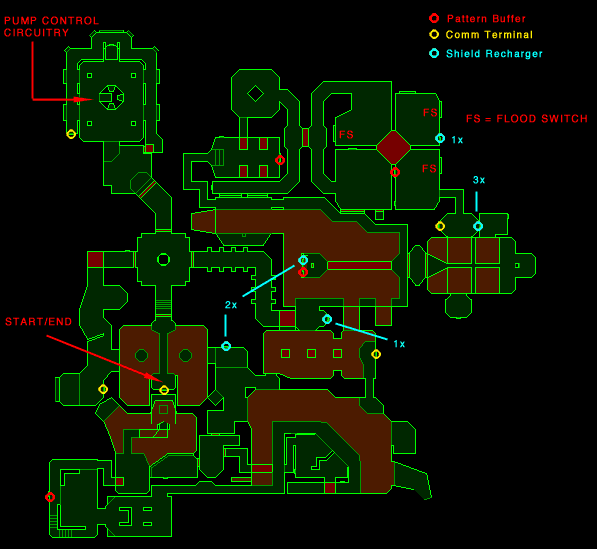
Level 3 - Lava Me Tender
(click map above to open it in a new window)
Goals
- Break pump control circuitry
Walkthrough
Your only goal in this level is to find and destroy the pump control circuitry. Of course, you have to cover the entire level before that circuitry is made available to you...You start on a small platform in a lava pool. You can pick up all the ammo (triggered as you enter the bridge to the other side of the lava) and read the term without fear... but once you get close to that door in front of you, watch your back. The beginning of the level is pretty straightforward; Only one path presents itself. Follow it to a small platform with lava on both sides of you, and a recharger in front. You have two choices at this point: you can jump across to the small island to your left (requires a grenade or shotgun blast), or you can head east, jumping from piece to piece. Jumping gets you a fusion pistol, a 2x charge, and a save term... but you have to jump back. Heading straight gets you along your path to the rest of the scenario. (There's a switch on the island, as well... it lowers some platforms in the lava pool to the right of where you entered this area. While you can go this way now, it actually pays to finish this section first.)
Travel counter-clockwise around the pool, and eventually you'll find yourself in a room full of platforms, with a switch. It's just a timing thing... hit the switch, and head to the plat at 1 o'clock. When it's low enough, jump on, then follow them around until you get to the upper passageway. If you miss, or fall off, or are too slow, don't worry... just wait until the plats are up all the way, and try again. Practice makes perfect!
After a bit of fighting, you'll find yourself in an area with 4 passageways. (One you just came out of.) Two of them head into darkened, empty rooms... hold off on these. The last one brings you to a switch; hit this, and head into the nearest darkened room. There are some panels on the wall... breaking them will flood the entire area with lava. You have two options for escape: there's a teleporter in the southwest quadrant that opens when the lava starts. There's also a room you can swim to in the southeast quadrant with a 3x recharger in it. Take your pick... but move quickly! (Of course, both exits are avialable to you without flooding the room... this advice is simply there for those who break all wires panels they come to.)
The teleporter brings you back to where the shotgun was waiting for you (near the 2x recharger). The upper room overlooks a darkened room. If you choose the teleporter, you'll find you can enter this room from the east end of the lava pool you traveled around. You can actually completely avoid this room, if you choose... but it's loaded with ammo, so it's probably worth your while. Head straight to the back of it, and hit the switch at the backside of the pillar... this will lower a goodly chunk of the floor into the lava, along with any baddies on it. Kill the rest, then check out the lower rooms. They're guarded, but they have some nice goodies. (A platform switch in each room will get you back out... never fear.)
When you come out again, you'll find you've got a walkway to the 2x recharger/pattern buffer. This is a little handier than grenade-jumping. This would be a good time to save. Now head south, into the other lava pool, and jump from plat to plat until you're on solid ground again. Kill your way to the fortress you'll eventually find.
At this point, you can either head clockwise around the fortress, and enter the top of it, or counter-clockwise around it, and head behind it. Going up gives you a few nasty fights... but there's a 2x recharger in the last room, and a switch that you use to set a walkway properly. (It's another one of those "turn it on to move, turn it off to stop" switches, with the plat it controls behind your back... a little tricky, especially with enforcers everywhere firing at you.)
Heading counter-clockwise around the fortress leads you eventually to the bridge you set if you went up. (The advantage to going this way first is the pattern buffer on the way.) The bridge leads you to a passageway that leads back to the initial area... with a few ambushes on the way. At this point, the door to the area containing the pump switch circuitry is open. Fight your way to the top, shoot the wires to destroy the circuitry, and hightail it out of there. (The door will eventually lock you in, so don't dawdle too much.) Once this is destroyed, head back to the term you started the level at... you're done!
Available Weapons and Ammo
|
|
Secrets
- There is a teleporter out of the lava in the pool surrounding the 2x switch... it can be found by circling around the back of the switch island. (Good for the times you fall in unexpectedly.)
- In the small tunnel at the bottom of the elevator heading into the fortress, there's a rocket launcher and some missiles.
