Objective: Get to the end
Don't you just love the mines?
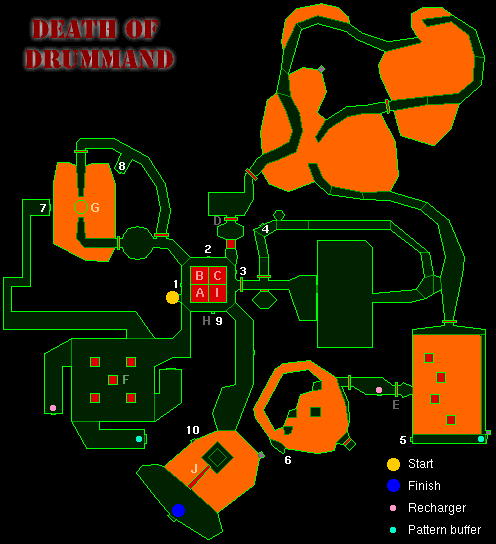
First jump off the ledge where you arrived to the bottom of the shaft. There are several exits from the shaft at varying heights; you can use switches 1, 2 and 3 to activate the various platforms to reach them. Check out the first level (bottom left) first: stand on platform A and hit switch 1 to reach it. You'll find a terminal, 2x recharger and pattern buffer in the room there. Similarly, you can reach the second level (top left) by standing on platform A and raising it, then shooting switch B and jumping onto platform B as it rises, and so on. If you look on the second level, you'll see a ramp running through it, but the way is blocked by lava (column G) flowing down from the ceiling. You'll have to turn this off before you can get past.
Return to the shaft and go through the door at the bottom. Destroy the aliens in the large room ahead, then enter the small corridor to reach switch 4, which you must flip. Now go back to the central chamber, where you have to reach the third level (top-right). Stand on platform A and hit switch 1, then hit switch 2 and jump for platform B before it raises too high, and now do the same for platform C. You can now easily walk onto the ledge. A wall will lower itself revealing door D, which you opened a little while back. You will find yourself in a large area filled with lava, with only a few narrow bridges enabling you to cross. (If you fall off one of the bridges, head for the teleporter below as quickly as possible.) The bridges will eventually take you to a door, with anther lava-filled chamber behind it.
By carefully jumping from one platform to another (hint: walk, don't run), you will reach the other side, where a pattern buffer and switch 5 is located. (Again, if at any time you fall off the platforms, head for the teleporter.) Flip this switch to open door E, and go to it. Immediately to your left there is a 3x recharger, which you probably need desperately by now. Open the door ahead, and enter the room behind it. Switch 6 is at the other end, and it can be reached by using the raised stepping stones. (Be careful, as there's no teleporter this time!) After you've flipped swich 6, find your way back to the central shaft. You now need to return to the first level, where the central of the five platforms is now active. Use this platform to reach the tallest platform leading to switch 7. After flipping it to turn off the lava flow, return to the central shaft once more.
Use the lifts to reach the second level (top-left). Once there, open the door located in the circular room and use the bridge to reach the far end of the lava-filled chamber. Beyond the door here is switch 8, which you must flip. The corridor will lead straight back to the central room, where you'll find switch 9 now visible. This will allow you to reach the top level (bottom left), which leads to the final area of this level. Get rid of all the bad guys here, then hit switch 10 to raise platofrm J. The SSML will now be available to you, as well as the final comm terminal. On to Doughnuts for Dinner!
