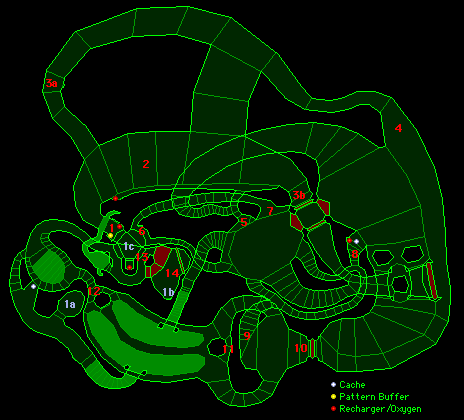
Hell Pfhor You
level view - Secret Level
Help Details:
Author: C Lund
Notes: Because this level was originally made for "The Salinger Incident", it's been retextured 3-4 times. In the original version, the player needed to find a chip in a secret location in "The Exit Door Leads In" to access a secret location on this level. Unfortunately, that made it possible to mess up levels further down the line because the player could be carrying a chip into a retrieval level.
This is a very difficult level. Save the game under a different name before you enter this level just in case you aren't able to complete it. If you want to have some serious fun, enter the game on TC, save, and then quit. Open the saved game with a cheater app and max out your shields and ammo. Continue the game, but this time in a reckless way. You'll be lucky if your feet ever touch the floor.
Watch out for PCMs. They're everywhere - and they respawn.
Mission Type: Repair
Walkthrough:
- Entry point. Charge your shields, pick up all the ammo you can carry and use the pattern buffer. Then jump off the ledge.
- There are lots of troopers down here. If you climb up on the ledge with the recharger, more troopers will teleport in.
- a-b Flipping the switch at a will open the door at b. It will close on it's own unless you flick the switch off again. This is not necessary to complete the level, but it makes life easier.
- At this point you'll see a lot of troopers ahead of you and a juggernaut in the open space to the right. Take out the troopers while staying out of sight of the juggernaut, and then go for the juggernaut. This is the only juggernaut in the entire game that's worth destroying. This is not necessary to complete the level but it makes life a lot easier. Once the juggernaut is down (or you decide to leave it alone) jump off the ledge and head north towards 5.
- Watch out for the juggernaut in the area ahead of you. Wait until it's back is turned and then run along the shelf towards 6.
- Flip this switch to open the door at 10.
- You have to choises up here; one is to jump over the platforms (at the yellow portal) and then head on to 10, and the other is to jump over to the entrance leading to 8. Again, mind the juggernaut.
- The recharger at this location could prove quite useful to you. But you will probably not be able to use it without taking out the juggernaut outside (see 4).
- Clearing out the troopers on this shelf isn't necessary, but doing so prevents you from being greeted by a blizzard of grenades when you pass the door at 10.
- This door is opened by the switch at 6. There are probably a couple of enforcers nearby. Watch out for the troopers at 9.
- This is a good place to snipe at the enforcers around the plasma pools. Make sure to clear out the enforcers between 10 and this point first or they'll come after you.
- When you reach this point, be prepared for the enforcers on the other side of the plasma pool. The best way to deal with them is probably by lobbing a series of grenades into that area before they have a chance to shoot you.
- Log on and be taken to "Not This Again…" via "Rozinante VII". While you're standing here, the platform to the sides of this terminal will open and several PCMs will swarm out.
- Entering this room will release two MOAHs.
Secrets:
- a-c To get to a you either have to do some grenade/rocket hopping, or you have to take a plasma swim and then deal with some enforcers. Whichever route you take, once at this point, flick the switch. That opens the panel at b which gives you access to the switch that lowers platform c. Doing so will give you access to the carpet mortar, a whole lot of ammo, and a x3 recharger.
Back to the Level Flow Chart
Back to the Introduction

