Deep in the Aardvarks
level view - Pfhor Plank
Help Details:
Author: C Lund
Notes: I had a lot of trouble with this level. Some of the problems were caused by too many sound sources competing for the sound channels, which led to a lot of ugly noise. But the main problem was caused by the game just crashing. That had a tendency to happen in the lower right part of the map. The problem was fixed by removing some monsters.
Mission Type: Repair
Walkthrough:
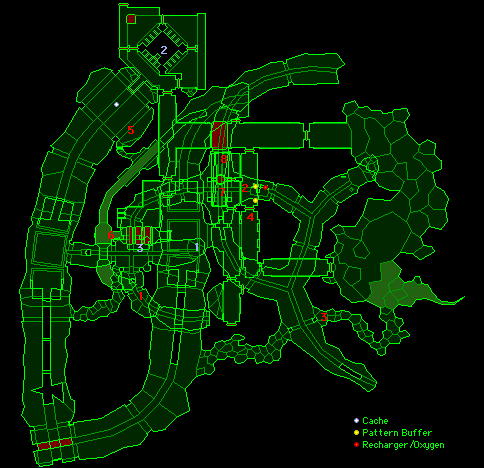
- Entry point. A lot of AR bobs will enter with you. Just read the terminal for instructions and drop off the ledge.
- Go here to save and recharge your shields.
- Take this narrow and easily missed passage. And watch out for the looker.
- Read this terminal. It will open the crusher gate.
- This door will open once you've been to 4.
- These are the crushers. The only way out is through and the best way to get through in once piece is to wait until the nearest crusher is closed, and then run into it and keep on running. You'll zip through once it is open and the process can be repeated for the next two crushers. Be ready for action once you're on the other side.
- Looking south and to the right, you'll see some wires. Carroway is chained in an ore crusher behind you. To save Carroway, you can smash the wires. Or not... The door behind you takes a little while to open.
- This is where the plot splits again. If you smashed the wires and saved Carroway, the terminal will take you to the Salinger plank, via "Rozinante IV" and then on to "10001 Nordic Nerds". If you didn't smash the wires, you'll be taken to "Hex Level 73" via "Rozinante V". In either case, a bunch of troopers are about to enter this room.
Secrets:
- If you take a right turn when you jump down from 1, you'll find a small side tunnel. There is an infravision powerup at the back.
- Tab the yellow glowing panel here to find an invulnerability powerup.
- Go through the crushers up here (there is a good chance you'll see a dead enforcer in there) and you'll find some neat stuff behind it. The powerup from 2 will make this a lot easier.
Back to the Level Flow Chart
Back to the Introduction