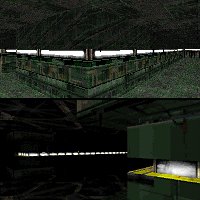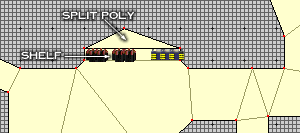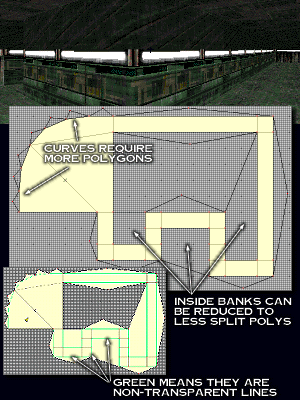
Split Polys are actually a polygon that is on a side of another polygon which in turn splits the wall that it is attached too. This is why Grendel refers to them as Split Polys.

This simple technique has many rewards. Three main ones come to mind, and so those three will be shown and demonstrated for your own use in your own creations.


The three main things that are a result of making split polys are:
  • Awesome Detailing,
  • Light Casting.
  • Shadow Casting.
  • Bouncy Fixing,
  • Shelves for Item Pickup.


    Detailing:
    The first one, and the most widely known and used, is the Detailing. This is where you put a split poly on walls in hallways or rooms so you can just add more detail and looks to them.

    The process is simple, and easy to do. All you need to know are a few Forge Basics. The Example map shows the simple way you can create these.

    The Steps:

  • Step 1: Draw Lines where you will be putting a polygon against a wall. If you will be making solid details like this example, use the least ammount of lines possible. As you see in this example, some lines cut over and enclose a bunch of walls at once... this is good.
  • Step 2: Fill in the Polygons.
  • Step 3: Set the Heights of the floor and ceiling. Easiest done through visual for the first one to make it look right, then do it in the height view for multiples.
  • Step 4: Set Textures. To set a texture in the middle for the detail, hold shift down and move up to it and click.
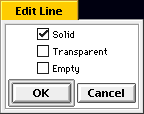
  • Step 5: Set Line Attributes if needed. If you put a texture in the middle as a detail, then set the line to be Solid and NON-Transparent like this.


  • Light Casting:
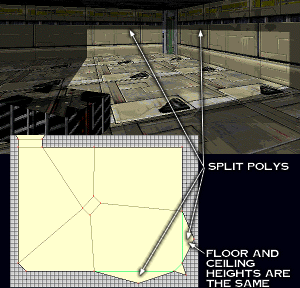
    Many people cast lights from a source, either on a wall, or from a unit placed on the floor. Making lights with sharp contrasts to things around them is a great enhancment feature, and many know this. Something else to do to make the effect even more greater, is to use a split poly to make where the casted light ends on a wall.

    This Example map has an example of both this light casting and the shadow casting examples to see.

    The Steps:

  • Step 1: Make a light source and select what walls will have the cut light on them.
  • Step 2: Create a split poly on those walls.
  • Step 3: Set Floor AND Ceiling Heights to the same height. An easy thing to do is first go into visual mode, and pull down the ceiling to where it would look good to have the light falloff point. Then go into draw view-elevations mode and make the floor the EXACT same height number as that of the ceiling. For example, if the ceiling ended up at 0.552, then make the floor height at 0.552.
  • Step 4: Set the Textures, make the bottom one bright where the light hits it.
  • Step 5: Set Line Attributes to Solid, and NON-Transparent.


    Shadow Casting:
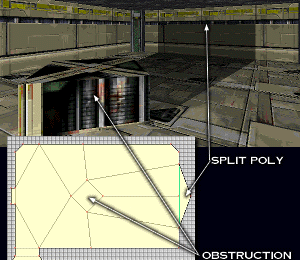
    Like that of the light casting, the shadow casting is done pretty much the exact same way, with the exception that you reverse the lights. Some object causes a shadow to be cast from a light source, and that's what this example covers.

    This Example map is the same as the one above for light casting, because it contains both examples in two rooms.

    The Steps:

  • Step 1: Create a split poly where the shadow will fall from the Obstruction.
  • Step 2: Make the floor and ceiling heights exactly the same for the split poly. Just like the way you did it for the light casting.
  • Step 3: Set Textures. This time making the bottom half darker because of where the shadow is, and everything above and around it brighter.
  • Step 4: Set Line Attributes to be Solid and NON-Transparent.


  • Bouncies:
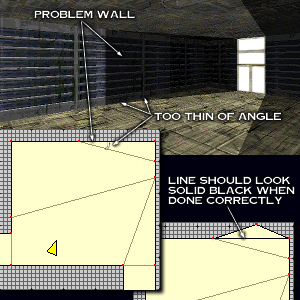
    Bouncy walls can also be fixed using the Split Poly. Bouncy walls are not walls where you are trying to walk through an opening and then jerk back to the middle of the polygon. Bouncy walls are when you press yourself up to a wall and you start to jiggle uncontrollably on the wall piece. These are commonly caused by a sharp angled polygon border near the troublesome wall, or a thin polygon against that wall.

    This Example map has a bouncy wall for you to see and understand exactly what is meant.

    The Steps:

  • Step 1: Draw Lines, put'em where you are having the bounce problem.
  • Step 2: Fill in the Polygon.
  • Step 3: Set Floor AND Ceiling Heights to equal that of the adjoining Polygon Floor Height ONLY. This example has both set to 0.00. This portion cannot be done in Visual mode, you have to do it in view height mode.
  • Step 4: Set a Texture on the plain white wall.
  • Step 5: Set Line Attributes to Solid, and NON-Transparent.


    Shelves:
    Sometimes Items will not get picked up off ordinary shelves, but when using a technique like the one you used to fix Bouncy walls, you can fix a shelf so that Items get picked up easily.

    The steps are the same as the Bouncy-fix steps, but you apply them to the back of the shelf instead of a wall in a hallway or room.