Wading in Vitriol
level view - Pfhor Plank
Help Details:
Author: C Lund
Notes: This was once the toughest level in the entire scenario - which is appropriate considering what's going on here. But that is no longer the case now that the "vidmaster levels" have been added.
If you think this is level tough as it is now, you should've seen the version I first presented to the betatesters. Almost 60 monsters were pruned after that...
This is not a level that is well suited for "banzai"-type gamers. Jump into the midst of the pfhor with your guns blazing and you'll most likely be sent into orbit.
One word about the tar: Fall in and your screen goes black (unless you're playing the AO Light version). Just swim up. You'll be able to see again once you get your head above the surface. Note that your shields will probably be drained by the time you manage to exit the tar.
Mission Type: Exploration
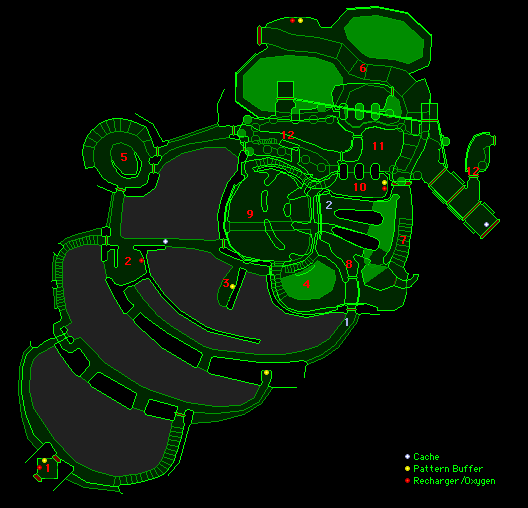
Walkthrough:
- Entry point. Make sure to save, power up, and pick up the ammo. Follow the stairs up to 2. Don't stop to fight or you will be killed.
- There is an enforcer here and a number of fighters and a PCM are converging on this spot. When you've dealt with them, use this area as a sniping post for the fighters on the ledge north of this place. Grenades and rockets are good for getting rid of them.
- You don't *have* to come here, but then you'll miss out on a patter buffer. The downside to coming here is that doing so will cause the pfhor you wiped out around 2 to be replenished.
- Clear out this area and then use it as cover for sniping on the sections to the north. When those sections are cleaned out, climb up the stairs and follow the ledge to 5.
- Use the shotguns to pick off the troopers one by one as you climb the stairs, then turn and take out the thinker. Once that's done, flip the switch to open the door to 6 (you probably passed that door on the way here). There's a good chance there'll be a lot of fighters on the floor below, so watch it.
- The "banzai" method works fine in here. Just don't step on any lookers and try not to fall into the plasma. Clear out the room and then log on the terminal next to the door and Durandal will open it for you. There's something behind that door..
- The door will shut behind you when you climb these stairs. Be prepared for trouble.
- In this area you'll find hunters, s'pht'wr, and a thinker.
- Watch out for the lookers. This place is crawling with them.
- This is where it's easy to make a mistake. Jumping off the ledge with a war cry down into the High Pfhor Council (11) is a good way to get killed real fast. If you can clear out areas 11-12 as if you were Rambo on "Normal" or better, please send us the film. Instead of jumping off right away, use the ledge as a sniping platform. Use the maser to take out as many monsters - particularily High Pfhor - as you can. Conserve your ammo and use the pattern buffer and shield recharger before jumping down (as you'll have to do eventually).
- Once down here, run for cover. The best place is probably right beneath the shelf you came down from. Use this as a sniping base to clear out more areas so you can gradually move around a bit. The High Pfhor should be your prime target since they're the ones that limit your movement. Watch out for all the mobile monsters that are coming your way: fighters, troopers, hunters, wasps, and lookers. Remember that killing a looker in a mob of other monsters is a good way to take out the whole group.
- These two areas need to be visited by the player before the mission is completed. Then log on the terminal and be taken to "Toadstools".
Secrets:
- This spot can be reached if you're willing to take a swim in the tar. Once you climb up on this shelf, head through the door to the north and keep on going until you find the ammo cache and the invulnerability powerup - beneath 2 (the secret, not the waypoint).
- Once 8 is cleared out, wade through the plasma to the northeast and turn to the left. You'll find lots of stuff here.
Back to the Level Flow Chart
Back to the Introduction