The Tar and Feather Club
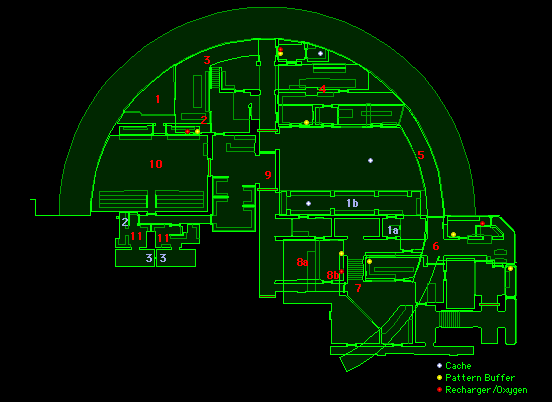
level view - Salinger Line
Help Details:
Author: C Lund
Notes: This was originally intended to be the climax of the Salinger line, but turned out to be too easy and too tame. The gameplay is fairly straightforward; kill everything but the UESC marines and the cleanroomBobs. The walkthrough is just a suggested route.
The two most useful weapons in this level is the maser and the pistols. You won't really need anything else. All you have to do is make sure you see them before they see you, and you'll be fine.
Notice how the cleanroomBobs keep teleporting out?
Mission Type: Exploration.
Walkthrough:
- Entry point. Lots of people are shooting at you and the UESC troops you came in with. Get your head down and run for cover.
- Save here, and then run up the stairs to 3.
- Clean out this section and then jump over to 4.
- After clearing out this area, go to 5.
- Only go as far as you need to activate everybody. Then run back and let the other guys fight for you - or stay and fight if that's more to your taste.
- Watch your step at this junction. You'll be shot at with masers from one end and pistols from the other. Head over to 7.
- After clearing out this area, go to 8.
- a-b The door at b is opened by standing at a and firing a grenade or fusion bolt at the switch next to the door. A second bolt or grenade will have to be fired to prevent the door from closing. When the door is open, go in and save and stuff.
- Watch your step in here. Lots of masers and pistols in use. Use the compartments for cover.
- A lot of fighting will break out when you enter this room. Take care not to shoot the UESC troopers.
- These are the two polys that must be explored to complete the mission. Kill the pistolBobs and watch the cleanroomBobs teleport out. Then head back to a terminal and log on. You'll be taken to "Sucking Cherries".
Secrets:
- a-b Go to a and then jump down a floor. That'll give you access to b, where there is ammo and stuff.
- Tab the locker to get an invulnerability powerup.
- Tab the wall to look into the other shower stall. Not much to see though.
Back to the Level Flow Chart
Back to the Introduction

