Core Wars
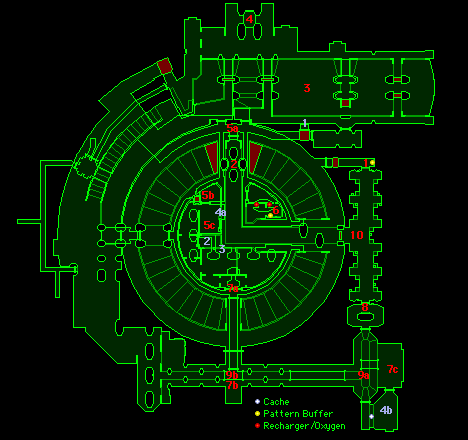
level view - Salinger Line
Help Details:
Author: C Lund
Notes: This was originally a level of "The Salinger Incident" and has therefore been retextured several times. As with many of the other levels on this branch the only monsters here are bobs, so pistols and masers are sufficient for most of the level. The maser turrets may give some of the players problems. Avoid standing out in the open and be ready to dive behind a pillar or corner each time you hear the hum of a maser. Always look for cover.
Don't waste your ammo on the masers; they can't be shot out.
Mission Type: Repair.
Walkthrough:
- Entry point. You might want to jam the door in an open position when you leave…
- Jump down here and head north.
- Clear out this area before going on. You'll have your first run-in with a maser turret on your way to 4. Remember to use the pillars for cover when going down that long balcony to the north.
- This is where the chip is.
- a-c The easiest way to the slot where the chip belongs is probably first to backtrack to 3 and then head towards 2 but stop at a. Then take the narrow opening to the right of the door. Take the platform at b up to c. Note that there are probably some Bobs shooting at you up there. Open the door at c and jump across to the other side. Then head to 6.
- Insert the chip and watch the lights come on. The rechargers directly beneath you are now online. When the level is done, return here, log on and be taken to "The Tar and Feather Club".
- a-c First jump back to 5c. Then find your way to a. The door here is a bit tricky. Then head down to b and take out the Bobs there, and ditto at c (only that Bob is carrying a maser).
- Flip this switch. Be warned that the door opposite thje one you took to enter this room has now opened, and there's a maserBob behind it.
- a-b To get back to the save term, jump down to a and then go to b. Watch out for the maser turret to the west. Then head north beneath 7a to the platform at 5b and then go to 6 and save.
- This area is a lot less dangerous than it may first seem. Your goal in here is to smash all the wires. Each time you smash a wire, a maser turret somewhere on this level goes dead. Take out the bobs before even entering the place. Then run for cover between two AI housings. You'll find four turrets are firing at you. The panels controlling these turrets are at opposite ends of this room. You can reach all the wires by running back and forth between shelters. Fusion bolts and grenades work too. Once all the wires are smashed, the mission is completed. Head back to 6.
Secrets:
- Tab the north wall on this lift and it will rise to expose a small cache of stuff. You might have some difficulty getting in since it's on the side of a rising platform.
- This small room can be reached by stepping up on the door at 5c when it's down instead of walking through it. Ride it back to it's up position and jump down here for some stuff, among with is an invulnerability powerup.
- Tab this locker for an invulnerability powerup.
- a-b Shoot the yellow square at a with a fusion bolt or grenade or something, and the door to b will open.
Back to the Level Flow Chart
Back to the Introduction

