|
|
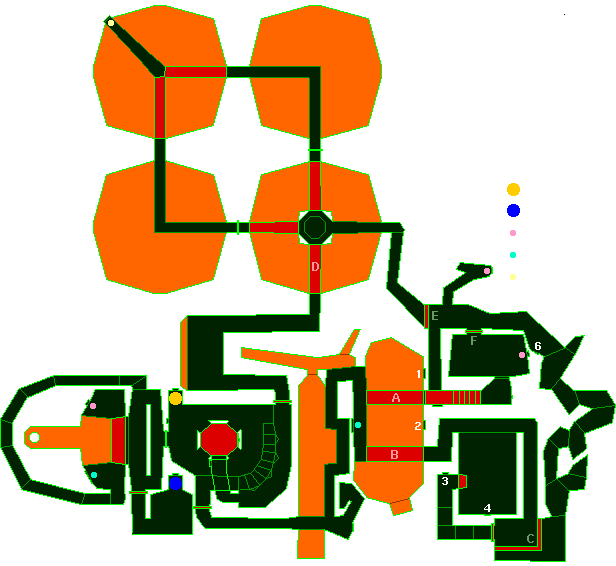
You're back in Troy Colony... You arrive in a large area with a platform in the center. (Note:
before proceeding, you may prefer to secure the 2x recharger and
pattern buffer in the area to your west. It is wise to save often on
this level!) |
|||||||||||||||||||||||||||||||||||||||||||||||||||||||||||||
 |
||||||||||||||||||||||||||||||||||||||||||||||||||||||||||||||
|
Now shoot switch B and cross the right-hand platform (platform B). Follow the corridor ahead until you come to two switches. It is safest to flip switch 4 first (this raises platform D to the north, providing a safe way back to the surface later on), and switch 3 afterwards, as the latter will reveal a passage containing several aliens and some extremely hostile marines (the ones in grey). Follow the newly revealed passageway to the end (there is a handy 2x recharger in an alcove to the north), until you find switch 5 around the corner (you did remember to lower those stairs, didn't you?). Door E will open into a large octagonal room with a small junction in the centre. The south bridge (platform D) should be raised by now if you need to go back to the surface (eg. to save) before proceeding. You might also want to return to switch 6 and open door F to find a very useful 3x recharger; again, you'll need all the help you can get at this stage. Back in the octagonal room, cross the west bridge into a second, similar room. Look out, though, because there is a juggernaut trapped in here with you. If you feel exceptionally brave, you may stand and fight, but it is all too easy to end up in the lava. You may find it easier to run through the room as quickly as possible into the third room where you'll find your objective: the repair switch. Continue through the fourth room until you are back at the junction in the first. Take the southern route back to your starting point, and go
through the door to the west. You'd be well advised to recharge and
save before leaving the level. Afterwards open the south-facing door
and activate the comm terminal. On to From Our Bacon Menu!  |
||||||||||||||||||||||||||||||||||||||||||||||||||||||||||||||